FREE ONLINE HOME GARDEN DESIGN COURSE FROM GARDENZINE.CO.UK

PART SEVEN: DRAWING THE FINAL PLAN

In part six, we looked at a sketch plan for a long, narrow garden (example 3 in our templates) and we discussed some design errors that the sketch plan had identified.

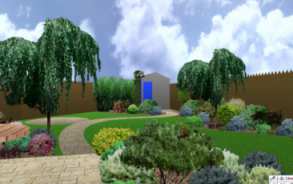
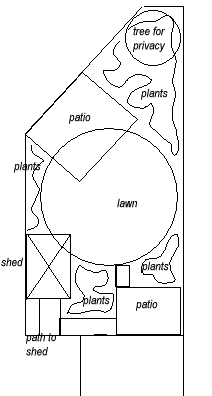
On the left, you can see the first sketch plan. After considering how the garden will be used and the design guidelines we have given you, the sketch plan has been altered. (Image on the right). The small patio at the patio doors has been extended to make more use of the sun and allow users to get some sun into the afternoon and the shed has been moved to the foot of the garden where it will replace the tree in providing privacy and occupy the shady part of the garden. The circular lawn has been replaced with one that sits on the diagonal and which serves to widen this narrow garden and the triangular planting beds create texture, colour and height.

Curves have been introduced with a long curved path and circular patio, adding interest to the lawn and serving as a hard paved area over which to wheel the bicycle to the shed.

Finally, the bins have been placed just outside the rear garden, at the end of the driveway and hidden behind the fence.

Now that we are happy with the sketch plan, we can go ahead and use it to produce the final plan.

If you have a good CAD based drawing programme and you feel comfortable with using it, you should draw your plans on this. This will allow you to print out many copies of the plan and to make changes without having to redraw the whole plan. If you intend to draw the plan by hand, you will have to make photocopies of the original. It may seem obvious but it is worth saying at this point. USE A PENCIL WHEN DRAWING BY HAND. That way you can rub out any mistakes.

Next, draw in the paving. Drawing the paving accurately and to scale will help you to estimate the amounts you need to order. So, on a 1:100 scale, a paving slab measuring 600mm x 600mm will be represented on your plan by a square measuring 6mm x 6mm. On a 1:50 scale, the same slab will be represented on your plan by a square measuring 12mm x 12mm.

You can see, in the drawing on the right, that the paving choice is random paving in three sizes. Drawing an accurate plan will give you a pattern to follow at the laying stage.

Because the curved path is designed for a bicycle to be wheeled along, the paving has to be cut at an angle to make up the curves. Drawing the path on paper lets you experiment with how this will be achieved without making expensive errors in real life.

Next, draw in the other hard landscaping features.

In our example plan, maintaining the lawn is going to be made easier by the addition of a monoblock mowing strip so this has been added to the plan so that contractors will be in no doubt.

You should then draw in the plants and accessories. This would include any statues, containers etc.

Lastly, you need to state some basic specifications, either on the plan itself or on a seperate page attached to the plan.

This information is particularly useful to contractors. If the correct specifications are stated on the plan, you will receive quotations based on a level playing field and you shouldn't receive a cheaper quotation based on using cheaper materials. For example, suppose you have chosen a paving slab in a buff colour, with a riven finish. There are a number of slabs on the market which would fit this description and they range in price and quality. Contractors can present you with a cheaper quote by choosing a cheaper slab of less quality than the one you had in mind. There's no point in blaming the contractor after he has laid the patio if you didn't give him the correct specifications in the first place.

Even if you plan to do the work yourself, a specifications list is still useful to remind you of your choices and to take to the builder's merchants with you when you make your order.

For contractors, you should also state on your specifications list whether you plan to supply certain materials yourself.

Below is an example of a completed plan with specifications:


The plan above is just about ready to be copied and given to landscaping contractors for quotation purposes. You can also use it for your reference and to take to builder's merchants. But there is one last thing you need to think about, especialy if you intend to ask your landscaper to supply the plants as well as the materials.

You can, of course, buy the plants yourself and, after all the hard work of planning your garden, a day at the garden centre or nursery can be an enjoyable experience. However, for a complete garden build, you are likely to spend several hundred pounds on the plants and, if you buy from the nursery, you are likely to end up with plants that have interest (in other words, look their best) only in the season during which you bought your plants.

There are two ways to get around this problem. You can either choose to leave spaces in your garden and visit the nursery at various times throughout the year until you build up your collection or you can draw up a planting plan. For details of how to draw up a planting plan, see Gardenzine's article: how to draw a planting plan

Whatever plants you choose, try to match them with your chosen style. Below are 3d images of the plan above but with two different planting styles:


Go to part eight of the course: building the garden.


© Gardenzine. 2006 - 2009. All rights reserved